You are using an out of date browser. It may not display this or other websites correctly.
You should upgrade or use an alternative browser.
You should upgrade or use an alternative browser.
1968 Forester travel trailer project
- Thread starter Glaciers
- Start date
Glaciers
Alaska Land of the Midnight Sun
Just call it drift. Not the first timeJust realized I posted in the wrong thread. Guess it's not any worse then some of the drifts. Tired and getting ready to leave, so going to leave it. If the mod wants to move it to what you doing ok. If not ok.
Glaciers
Alaska Land of the Midnight Sun
Well getting going on the repairs of the old travel trailer again. Haven’t been home much since November until mid April so nothing has been done other then keeping the old girl dry and inside.
But pulled the axel cleaned it up and reinstalled under the spring set for a little over 4 inches of lift. When I pulled the axel I assumed that the brakes would need to be rebuilt along with new bearings as well. Quite right, someone years ago had removed all of the brake right down to the backing plate. So that was easy, buy complete new assemblies.
Lot of washing, sanding, and wire brushing then painting. Reusing drums but new races and seals.
New spring perches to set on top of the axel to nest up against the underside of the spring pack along with a new U bolt kit.
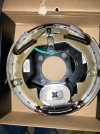
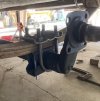
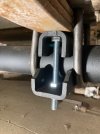
Wanted to buy a new straight axel to gain the extra height but 6 to 8 weeks out and another $150.
Not having a welder I set the new perches on top and drilled the original welded perch for a bolt to pressure the new perches into a stationary position. Leaving about a 1/2 turn of the bolts loose till after the U bolts are clamped tight, then run the bolts up tight with a lock nut on the bottom side. I’ll put witness marks on the axel to check for movement.
This is such a light trailer 2100 pound empty it will likely never need welding. Next is to finish up the frame repair.
But pulled the axel cleaned it up and reinstalled under the spring set for a little over 4 inches of lift. When I pulled the axel I assumed that the brakes would need to be rebuilt along with new bearings as well. Quite right, someone years ago had removed all of the brake right down to the backing plate. So that was easy, buy complete new assemblies.
Lot of washing, sanding, and wire brushing then painting. Reusing drums but new races and seals.
New spring perches to set on top of the axel to nest up against the underside of the spring pack along with a new U bolt kit.


Wanted to buy a new straight axel to gain the extra height but 6 to 8 weeks out and another $150.
Not having a welder I set the new perches on top and drilled the original welded perch for a bolt to pressure the new perches into a stationary position. Leaving about a 1/2 turn of the bolts loose till after the U bolts are clamped tight, then run the bolts up tight with a lock nut on the bottom side. I’ll put witness marks on the axel to check for movement.
This is such a light trailer 2100 pound empty it will likely never need welding. Next is to finish up the frame repair.
Ian
Notorious member
Standard 2K electric trailer brakes. Can't buy shoes and magnets for what a loaded backing plate costs. The spring perch for the flip is ingenious, never seen such a deal much less as a kit you can buy turnkey, great solution to not having a welder and looks more than good enough to handle any kind of braking torque or unexpected potholes.
Bret4207
At the casting bench in the sky. RIP Bret.
I've seen a lot of electric trailer brakes over the years. Part of the job was pulling the breakaway coupler and seeing if the brakes gave a hint of working. Out of many thousands of trailers, I think I saw maybe 4 or 5 that would actually lock up and skid on dirt. Most were either not powered due to a bad battery or bad wiring. Some were simply rusted solid thanks to NYS salted roads. My stock trailer had inoperative brakes when I bought it. I'd redone the wiring and added a new breakaway. Why didn't they work? The entire set up on both sides was put on upside down!!!
You never know...
You never know...
Glaciers
Alaska Land of the Midnight Sun
Well yesterday I got the entrance door for the small travel trailer I’m working on repaired. Had to shim the hinges that were worn. Installed a new door latch that has a lockable latch but a built in deadbolt as well. Finally painted the exterior skin. This door wouldn’t close completely and was secured with a padlock hasp when I got it. The original locking mechanism had been removed and covered over. Now just give it a gentle push and it swings closed and latches. Smooth!
I also replaced the Robertshaw propane valve with built in thermostat and the furnace now functioning nicely. And while doing propane replaced the Humphrey light, and tested out the stove. All working! Next will be the refrigerator but it will have to come out and be cleaned up on the bench and tested. Got my fingers crossed on that one.
Also been working on the “trunk” of the trailer as the previous owner could not get the trunk door closed so it’s had rain and snow flowing in for 20 years. I new it was going to be a problem, rotted wood, rotted trunk door and so on. The trunk door hinges down so if it’s not closed, it’s a scoop. Removed all the rot and got the inside deck replaced, just need to rebuild and paint the trunk door. Pretty simple but tedious job there.
Today going to complete the “trunk” part of the project and replace all the clearance lights with new led “vintage” lights, and teardrop side marker lights. The wiring job got easier and faster when Jeff Bezos suggested “hey others bought this with your lights”. Well it was a 7 way flat plug and 8 foot pigtail with a water tight junction box, pre wired along with a brake away switch for $39! No brainer there.
I picked up 2 AGM batteries for the unit from my old place I worked. These are used batteries that the U of A switches out every 4 years from there battery banks. $60 each for a $400 battery that still has 4 years of life left. Kick butt batteries, 12 volt about 150 amps each at a 20 hour rate. But, they weight about 120 pounds each. So one will go on the tongue and one will go under the dinette about 4 feet further aft. Might put them both under dinette seats. Have a Samlex 1500 watt sine wave inverter coming as well. Just need to see about a 12 volt solar panel 150 watts or more. Hoping Jim has a deal laying around.
The cosmetics will end up being next winters project I’m thinking.
Glaciers
Alaska Land of the Midnight Sun
Well all good intentions on my end haven’t allowed for much time for this project other then a couple hours here and there. Same goes for shooting, did a little in May, but other then some casting, that’s it. Cabin project, cabin, cabin.
Well we had a forest fire in there as well.
So I wanted to show some pictures of the progress, some described in the post above. Some before and after pictures.
Before
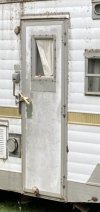
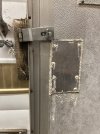
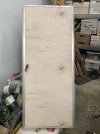
Trunk door
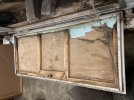
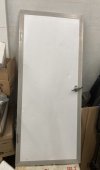
After door repairs
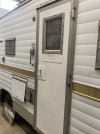
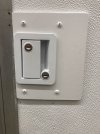
Trunk door repair but won’t be installed till DC & AC wiring is finished
Then there’s the AC inverter and batteries going in forward under the dinette seats
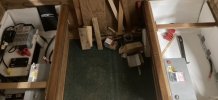
These AGM batteries I talked about are very powerful, about 150 amps each, but, they are large and weigh about 100 pounds each. That’s why they are located under the dinette 4 feet further back from the normal location behind the propane tanks. Weight on the hitch is 370 without any batteries installed, with the batteries dinette location hitch weight is 420. Rest of trailer is totally empty.
Ian talked about the frame looked like it was trying to divorce the camper box, and it does look that way mainly because of the jackknife damage done by the ladies on the trip north. There was some damage done for sure and if you look in the far right wall floor you see some strong tie angles tying the floor and walls together.
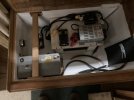
In this picture I have made a elevated platform with a 1500 watt Samlex sine wave inverter under and on top is a 30 amp charger, auto switch that will switch from shore power to inverter automatically when not plugged in. Also the new 12 volt fuses box will be located there. On the lower floor is the main 200 amp ANL fuse, and on the bulkhead is the main battery on off switch.
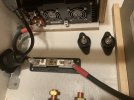
Finely the main fuse and 2 studs for cable connections rather then try and stack connections on top of the battery.
Edit: all cables are 1/0
Well we had a forest fire in there as well.
So I wanted to show some pictures of the progress, some described in the post above. Some before and after pictures.
Before


Trunk door

After door repairs


Trunk door repair but won’t be installed till DC & AC wiring is finished


Then there’s the AC inverter and batteries going in forward under the dinette seats

These AGM batteries I talked about are very powerful, about 150 amps each, but, they are large and weigh about 100 pounds each. That’s why they are located under the dinette 4 feet further back from the normal location behind the propane tanks. Weight on the hitch is 370 without any batteries installed, with the batteries dinette location hitch weight is 420. Rest of trailer is totally empty.
Ian talked about the frame looked like it was trying to divorce the camper box, and it does look that way mainly because of the jackknife damage done by the ladies on the trip north. There was some damage done for sure and if you look in the far right wall floor you see some strong tie angles tying the floor and walls together.

In this picture I have made a elevated platform with a 1500 watt Samlex sine wave inverter under and on top is a 30 amp charger, auto switch that will switch from shore power to inverter automatically when not plugged in. Also the new 12 volt fuses box will be located there. On the lower floor is the main 200 amp ANL fuse, and on the bulkhead is the main battery on off switch.

Finely the main fuse and 2 studs for cable connections rather then try and stack connections on top of the battery.
Edit: all cables are 1/0
Last edited:
Glaciers
Alaska Land of the Midnight Sun
RicinYakima
High Steppes of Eastern Washington
Nice quilt!
Petrol & Powder
Well-Known Member
That is a nice DC electrical setup. You will not be lacking DC power!
Well Done.
Well Done.

