Lyman 35887

TomSp8

Active Member
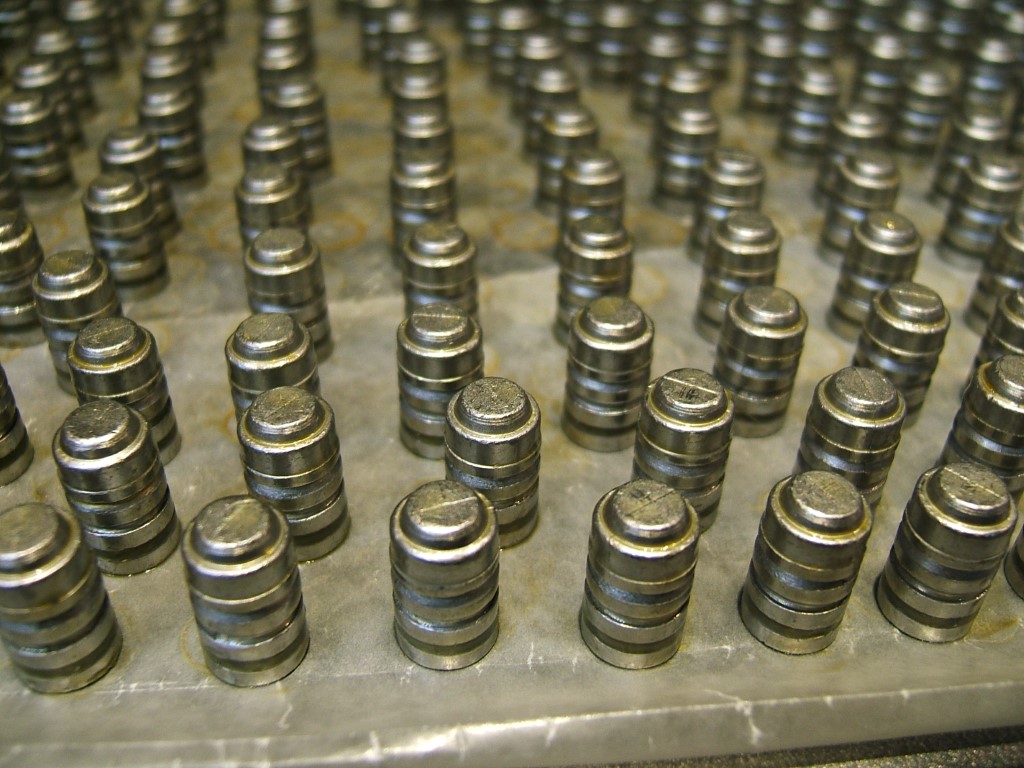
Hey guys. From my estate auctiin molds I am first playing with this 140gr .38 wadcutter, Lyman 35887, single cavity. I washed it real well with hot water and dish soap, and soaked the blocks in evapo rust due to some minor surface rusting. ( Never tried it before, but seems to work pretty well!). Washed it again following that and blew it dry with compressed air and heated it up to dry. The bullets cast a sharp base, and drop pretty free, but the front band and flat around the button nose are kinda screwy. Any ideas? So far I've only used an aluminum Lee mold, this is my first iron one. Bit of a learning curve.20220717_174000.jpg20220717_173833.jpg20220717_173936.jpg
 

TomSp8

Active Member
These were the better ones. Some of them looked really wavy on the top flat. I ran this one thru the sizer with no lube just to see the high and low spots (.357 sizer). I would think the front driving band would go all the way to the top for a sharp edge, but it looks reduced around the entire circumference right along the top. The shiny spots in the pic looking straight down are actually low spots. Some of the worst ones were extremely out of round looking at them from the top. I don't see anything obvious looking at the mold cavities, really.
 

Dusty Bannister

Well-Known Member
When you open the mold after cutting the sprue, watch to see if the blocks are tilting before coming apart. That pattern makes me think the casting is dragging in the mold halves. Perhaps the blocks are on the wrong handles, or very loose on the handles.
 

TomSp8

Active Member
Perhaps a vent line clog not allowing air to escape? They seem to be directly across from the seams.
 

TomSp8

Active Member
Danny, they appear to fit the handles properly, and open reasonably square. I am through for the day, but will see if it does that when I open it while casting. I tried to take a few pics to show the mold. There is a distinct line in the upper drive band, and the bullet diameter is smaller above2022-7-17 20-3-37 (1).jpg2022-7-17 19-58-7.jpg20220717_195529.jpg there as can be seen in the sized bullet in the original post. Can this simply be the way it was intended? Still not sure about the top flats though. I don't really see anything amiss. I am guessing this mold is pretty old, by the mold number. Is it worth trying to correct by lapping you think? Only cost me $25 including the handles, so If I mess it up I'm not out anything, and I'd still have the handles and spare parts.
 

RBHarter

West Central AR
Looks like a cut , handle bump to open , drop , close ,pour , repeat, mould to me . The nose step allows for a taper crimp I expect . I don't know that that as a fact but if an auto will feed it , it looks like a nose out taper crimp design to me .
 

Dusty Bannister

Well-Known Member
naLXtnv.jpg


This is a photo copied from a thread by Ben that shows the reduced diameter above the top driving band.

Some wad cutter styles are full diameter and those can be seated flush with the case mouth. The ones like you have can be seated out so that the reduced diameter will be centered in the cylinder throat. This is designed into the mold and not a mistake in manufacture or flaw in the casting. Seating the bullet out further will allow for more powder and resulting velocity.

Wait and see if the blocks are opening in parallel before you decide to fix something that might not be fixing.

Just because the mold came with handles, does not mean those handles are correct for the mold blocks. And you might check to verify that the attachment screws are solid where they pass through the handles and not something that fit, but happens to be threaded at that location so would allow more mold block movement.
 
Last edited:

TomSp8

Active Member
I was scouring the web looking for a drawing or pic of a cast bullet from a 35887 and ran across Matsbullets who offers a commercial cast of it, along with what looks like the ones in your picture. I do indeed see a faint line in the top driving band in his picture. What you said makes sense for a good taper crimp and feeding in a semi auto. So that is normal for this mold. Now to figure out the low spots on the top flats. Do you see any potential issue in the vent lines in the magnified photo by chance?
 

Dusty Bannister

Well-Known Member
I really think that the reduced area has nothing to do with crimp. I am not really looking at venting at this point. I would suggest that you use a micrometer to measure the bullet diameter on the same band, with the parting line at 12-6 and mic the diameter at 9-3m 11-5 and 7-1. That will give you a valid measurement of the bullet diameter and if the blocks are in alignment. Many times wad cutters are best shot as cast. The measurement will show you if you can do that or not.

Now you are going to make me search and see if there is any practice that the reduced area is intended for a crimping area, or if is normal practice to crimp on a band or in an actual groove on the bullet.
 

Bret4207

At the casting bench in the sky. RIP Bret.
That ring is supposed to be there according to the old catalog cuts and photos I can find. I think the lack of clean fill out is a matter of the mould being a little cool and the rough surface. That mould may take a few cycles of casting to start acting right. Or not! It may need some polishing with something like a typewriter eraser or a Cratex rubber abrasive stick. Going over the whole interior and face of the mould with a popsickle type stick, especially along the vent lines can sometimes help. Using Evaporust means there's a raw metal finish in the mould and sometimes (not always) that can give weird issues with filllout and appearance until it heat blues...or not!

This is the "art" part- figuring out what little action will give you a better bullet.

Agree that loose handles can sometimes give you messed up bullets, but my first mould handles were ho'made and loose as a goose and I still made good bullets.
 

TomSp8

Active Member
Thanks everyone. I will try these suggestions in the next couple days and post my results. Some are really horrible and some are like in the pic. I will try again, and really pay attention to see if I can tell whats happening. If I still have poor results, I'll set it aside for now and move on the next mold, an RCBS 38-150 KT........
 

fiver

Well-Known Member
maybe a little of it still sucked up into the molds cracks and crevices too.
the off color and rounded edges could simply be a little off gassing.
 

TomSp8

Active Member
Okay, you experienced group of amazing guys....(yea, kissing ass here...lol) latest effort this morning with this mold. Experimented a bit with alloy temp and mold temp. The only way I can get the top flat is with a severely frosted bullet. Three levels of frosted bullets in the pic, along with what I normally get. I did remember to watch the blocks as they opened to drop the bullet and the bottom half def opens first, with the top half hanging up a bit and following. That makes sense to possibly be causing the issue as Dusty described above. I will try these blocks on another set of handles and see if it changes. 20220723_110710.jpg20220723_110637.jpg
 

Bret4207

At the casting bench in the sky. RIP Bret.
If they need to be frosty to come out dead flat then it doesn't sound like a mechanical issue. It sounds like a venting or contamination in the bock issue. Maybe I'm misunderstanding, but that's how it sounds to me. If it were mechanical then the hotter blocks shouldn't make a diff....I think.
 

TomSp8

Active Member
Well, not sure why the frosty ones came out better. But I paid close attention to Dusty's suggestion of mold not opening parallel and I tried holding the mold upside down when opening to drop. It seemed to make a difference as seen. Most of them no longer had those dips on the top flat edge. I was reading about Lyman handles (rather confusing) and since this an older mold based on the 5 digit number I am going to assume that what I need is the old style small single cavity handles. But very confused as to how to verify the old ones versus the newer style? They don't appear to have marked the actual handles with a description?20220724_110327.jpg
 

Dusty Bannister

Well-Known Member
If you measure the distance between the bottom of the mold handle slots of the blocks, you will probably come up with something like .630". Those require the small handles. To see if your handles are large or small, hold the handles so the jaws without the mold attached, are parallel and they should measure about .630+.

Large blocks measure about .785" and the jaws should be something similar or slightly larger.