Star lubrisizer top punch lock nuts

Pistolero

Well-Known Member
I am getting ready to make some Star top punches and they will need lock nuts, although I could swap them from
one to the other, but that is a hassle and totally loses your setting. If you keep the lock nut on the punch, the
setting will at least be close, often close enough.

So, I decided that making them hex nuts was a waste of time because I never put a wrench on them, just
snug them up finger tight. So, I decided to just knurl them. And no need for steel when I am just snugging
up, and aluminum is easier to knurl and machine. So, I got a piece of 3/4" round 6061T6 aluminum and chucked
it up. Drilled up and threaded it to the oddball 1/2-27 thread that Star uses.

Here we are at that stage. I drilled and tapped deep enough to get three locknuts out of the piece by just
cutting them off after threading and knurling.

After drilling and threading, and marked for how far to knurl.8638

I checked my knurling diameters table, which gives you the diameters which will let the knurling wheel roll around and find it's same grooves
on the next time around, necessary to get good knurling. Think of cutting gear teeth, you better come out to the same or you will cut off
the tooth on the second pass around. There was good news. The raw stock mic'd at 0.752" and the nearest knurling diameter for my
wheels was 0.753"....close enough. No need to cut down to a knurling diameter. So, just do it!

Here is the knurling tool set up in place.

8639

And here it is after knurling.

8640

Now, to cut a bit of a chamfer on the outer edges of the nut, then cut it off.
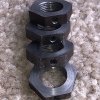
Here is the first nut, cut off, cleaned up a bit, deburred and screwed onto a factory Star top punch, to be sure it is OK.

8641

Repeat this process two more times.....

8642

Tomorrow, I will be making a couple or three top punches. I want flat faced ones because I size nose first most of the time.

I have a couple of short videos, one of the knurling and one of the cutoff, will process them and link up later.

Bill
 
Last edited:

Brad

Benevolent Overlord and site owner
Staff member
Looks good Bill. How did you chamfer the edge where you cut them off? Start a cut, change tools, chamfer, change tools back and complete cut?
 

fiver

Well-Known Member
put a lock nut in the side and you don't ever have to fiddle with depth settings.
 

Brad

Benevolent Overlord and site owner
Staff member
I believe he will be fitting them with a set screw.
I may well need to make some like that.
 

Wasalmonslayer

Well-Known Member
Fantastic work!
I love knurled lock nuts they work fantastic and keep you from need in wrench if used properly.
I just wish I could make them.
 

Pistolero

Well-Known Member
I will drill and tap one, see how it does with a nylon screw, or maybe a brass one.
Don't want to mess up the punch threads. A 6-32 brass screw slotted should work.
Brad, I used a straight angle insert tool, gave me a back chamfer and started the cutoff
cut at the same time. Then cutoff, leaving the right side chamfer but destroying the left one.
Then clean up, chamfer the front of the next but and move down, chamfer the back, then cut off.
 
Last edited:

Brad

Benevolent Overlord and site owner
Staff member
Ahhh, so you chamfered multiples at once then cut the off. Makes sense.

Does your lathe have a DRO?
 

Pistolero

Well-Known Member
No DRO, just dials. No, chamfer the front, then plunge cut the back, making
a second chamfer, then cutoff, tool too wide, cut thru the left side of the plunge cut,
so had to cut a new frt chamfer for the next one.
 
Last edited:

Pistolero

Well-Known Member
Knurling video. I start the knurling, then engage the automatic
feed and check to see that it is moving. Wait until it gets to my mark
and stop it. Looks like I need to clean the lens.:(


Bill
 
Last edited:

Brad

Benevolent Overlord and site owner
Staff member
Made some myself today.
Started with hex stock. They are drilled and tapped for a 4-40 set screw. Those little suckers are tiny!
These just need a little file work to deburr the edges.
 

Attachments

  • 45105113-653C-4AED-A960-BA5F8EDE9150.jpeg
    45105113-653C-4AED-A960-BA5F8EDE9150.jpeg
    126.5 KB · Views: 4

Pistolero

Well-Known Member
I didn't have hex in stock, and would rather not use a wrench. I will be drilling
mine for 6-32, trying to avoid using a steel screw to mess up the threads on the top
punch, and also trying to avoid using a jeweler's screwdriver! Can't find brass
socket headed setscrews, so have to cut off brass screws, then slot. I looked at 4-40,
decided to try one with 6-32 and see how it works. May do the others with 4-40
if the 6-32 is too big, looks like it should work, but...... :headscratch:

I suspect somebody sells brass socket head 4-40 and 6-32 setscrews, but I imagine
by the time you order 6 and pay shipping they are $6 each.

Starting with hex stock is almost cheating.;)

Also, I clocked the nut and marked it so that it will have the setscrew pointed out
when it comes up tight. :) I hate that with dies, lock nut is where you want it, but
you have to unscrew the die, hoping not to mess up the setting, to reach the
setscrew. I screwed the nut down until it hit, on the Star, then marked it where to
drill. Has to do with how the threads start on the nut, and in the Star housing.

Here is the plunge cut for back side chamfer. Actually makes two, and if I had a
thin enough cutoff tool, would be great, but my cutoff destroys the left side, so I
have to rechamfer for the next one.

8651

Here is the cutoff video, had to shorten it up.

 
Last edited:

Pistolero

Well-Known Member
The idea here is that, while I love my Star lubrisizers, I find them a royal PITA to set up when
swapping caliber and such, esp going from multiple lube groove bullets to single lube groove
bullets.

Going to make up dies and top punches in pairs, set up for a particular bullet. Once the holes are
right and the top punch is locked down, easy peasy to swap. No more drilling out lead pellets,
or driving them in, and screwing around 10-15 minuted finding the correct height setting on the
top punch.
It also tends to make me avoid bullet designs with multiple lube grooves that I might want to
make and lube in large quantities, but if I do, setting up a die and punch for that design and
bagging them together will make it simple. For same diameter bullets, single lube groove,
two top punches, one for each, locknut set will make swapping simple, too.

And yes, I could measure and write it down in a notebook to reset each time.....just not my
style. Besides, I have a lathe just sitting there grinning at me.

Bill
 
Last edited:

Brad

Benevolent Overlord and site owner
Staff member
I used a different approach. I drilled and tapped about an inch deep in the end of the rod. Faced off the end. Set the bandsaw to cut a little longer than I wanted. Cut one off, put rod back in lathe and face cut end. Cut off the next one and repeat. Each one had a good face and a cut face.
I made a mandrel the hold them on the lathe so I could face the cut side. By setting the carriage stop they are all with a few thou of each other in thickness.
Set mill vise with a stop and find center. Drill and tap each for set screw.

8652
 

Brad

Benevolent Overlord and site owner
Staff member
I can make a specific punch and nut for bullets I use a bunch. Buggered threads on punch are no big deal to me, they will likely never be removed!
I looked at 6-32 screws but didn’t like how little meat they leave on each side of the nut so I went 4-40. Power tapping in mill has worked well so far and that is with hardware store tap.
 

Ian

Notorious member
Bill, just drop a piece of solder or copper house wire down the hole and snug the setbolt against it. We been doing that with sprue plate pivot bolt lockscrews for like ever.
 

Pistolero

Well-Known Member
Thank you, wquiles.

Here is a finished unit in .45 cal, with a flat face, to push them nose first and with the lock ring
with a brass 6-32 setscrew to avoid thread damage.

8657

First time I has to swap the end gears driving the lead screw...necessary to get 27 TPI, a very odd one, literally
and figuratively.

Bill
 

Brad

Benevolent Overlord and site owner
Staff member
You got it to cut 27 TPI. Glad that worked properly.
Looks very good Bill.