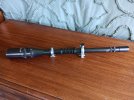
Unertl 2-inch 15X project

Snakeoil

Well-Known Member
My shooting partner warned me about this. He got talked into buying a Unertl of questionable virtue and wanted me to "work my magic" Needless to say, he has a much higher opinion of my skills than most, including me. My guess is he got it dirt cheap. I say that because it looked like a piece of sewer pipe sitting on the bench when I walked up to the firing line. I peered thru the scope and the reticle looked like somebody made it out of rope. So, I brought it home and dug into it yesterday. It has a missing locking screw where the end bell attaches to the main tube. One of the mounting screws for the center lens cell was broken and the stub was still in the cell. It looks like somebody had gone over the entire external surface with a wire wheel. There is pitting on the outside of the scope. I assume it was the same mechanical butcher that put pliers on the small diameter end of the end bell and the aluminum lens carrier that screws into the center lens cell. Pliers can be a curse in the wrong hands.

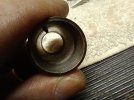
When I removed the reticle cell, the cross wires were fine monofilament fishing line. And the screws that held them each had a blob of rubber cement on them. Easy fix for later. The broken screw in the lens cell was another matter. I cannot remember the exact size but want to say that it is a #2 screw. A good portion of the remaining stub was protruding thru the inner wall. I tried to get a set of needle nose pliers on it and did. Got it to turn a little, but it stopped. I thought I could just screw it into the ID to remove it. But when the hamfist that last worked on this thing tried to get it apart, he drilled only part of the head off the screw that was broken. He left just enough that it would not screw deeper and exit the other side. Plus, he drilled it off center. So, I had to come up with plan B. I was able to center punch the stub and then drill it with a #60 drill. Then, taking a broken dental tool, I ground it to a point and then flattened opposite sides of the point to make a screw-extractor of sorts. I tried just forcing it into the stub and turning, but it slipped. So, using a small hammer, did the tap, turn, tap, turn, process and it came right out. The tap not only set the extractor into the stub, but it also helped correct some of the distortion on the threads from my first attempt with pliers. See, didn't I tell you pliers were dangerous.

With the screw out, I had to address some other pliers butchery on the eyepiece locking and power rings. Some gentle work with a triangular file cleaned up the damaged knurls and they should look fine once they are re-blued. That was enough for yesterday. Today, I'll start sprucing up the exterior of the scope, make a new reticle and put it back together if all goes well.

Here's a few pics. First is the scope completely disassembled. This shot should remove some of the mystery behind Unertl scopes.
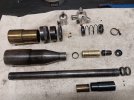
20240414_190032a.jpg

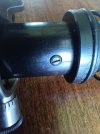
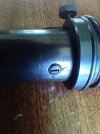
This is the broken screw in the center lens cell. Second shot shows it protruding on the inside. It was still not enough to grab and turn with needle nose pliers.
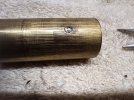
20240414_175952a.jpg20240414_180006a.jpg

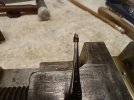
Here is that pesky little stub from the broken screw removed and impaled on my homemade dental screw extractor.
20240414_182122a.jpg
 

Snakeoil

Well-Known Member
Day 2

This will be short and sweet because it is 8:30PM and I just came up from the basement. The scope body parts have been sanded polished and blued. I was able to reduce or eliminate some of the pliers butchery and some of the pitting. But other areas were just too deep.

Once everything was blued I filled in the parallax adjustment graduations with white paint as well as the Unertl logo and the 15 on the power ring. Went to the hardware store to get a couple of 2-56 screws. They have 4 drawers of just gun screws. Unfortunately, the 2-56 screws are a small fillister head. They were too small to use as the center lens cell mounting screws. This was because the original counter sink was sized to fit the Unertl oval head screws. The other reason was Mr. Hamfist hogged out the other cell screw when he drilled the broken mounting screw.

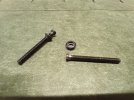
The easy fix would have been to order replacement screws from Parson’s or Iron Sight. But I have a lathe and plenty of time so I came up with a fix. I machined two tiny little counterbored washers with angle bases to emulate an oval head screw. I thinned down the fillister head on the new screws and they worked great. Actually, they look like something Unertl would have done. It took a few tries on the first one before I got the size and shape right. The second one was a snap.

The end bell locking screw was missing and it threads into the very thin main tube. So, I used the one OEM screw from the center lens cell. Plus, this way, the screws used for the cell both have those little washers I made so they match.

I thought it was just a matter of assembly now and making a new reticle. WRONG!. What I never noticed was that the thread for the eyepiece was also buggered up. Now this is a really fine thread. I did not measure it, but it looks like maybe 60 TPI. When I disassembled the scope, I simply unscrewed the eyepiece and set it on the bench. When I put it back on today, I wanted to screw it all the way down to check the threads and damn if it did not stop about half-way. So, I spent about 2 hours trying to clean up those mashed threads. Funny thing is the lock ring went on just fine. The threads in the eyepiece must be closer to spec. I ended up putting the tube in the lathe and going very slowly, chasing the thread with a triangular jeweler’s file. It took forever. But it now screws almost all the way home. Normally, you have to back them out to get the reticle in focus so it should be fine.

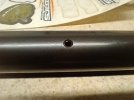
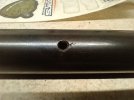
Not many pics today. Just the buggered hole in the tube for the cell screw and the little beveled washers I made to turn the fillister heads into oval head screws. Here is good OEM hole on left and butchered hole on right.

20240415_174824a.jpg 20240415_174832a.jpg

Here is a shot of the little beveled washers I made for the fillister head screws I bought. To give you an idea of size, the screws are 2-56. The thread diameter is 0.089 inch. That a tad over 1/16”. You can also see on the lower right screw where I machined the head to be thinner to allow a shallow socket/counterbore in the beveled washer. Those screws got cut to about ¼” for installation.

20240415_174808a.jpg

Tomorrow is reticle day. Also need to do some sprucing up on the mounts.
 

Snakeoil

Well-Known Member
Day 3

Turns out day 3 of the rehab was not only the conclusion of the project, but also a day of reckoning of sorts.

Let us start out with the positive things. I think that given what I started with, the scope looks great. The cold blue worked well for the post part. The scope does not look new and nor should it. There are still some pits and scars from previous owners. The blue actually looks like it was the original blue on a scope that has seen some use.

The beveled washers for the hardware store 2-56 gun screws not only look good, but look correct to the uninformed eye. I think it you put this on a table at a gun show, it would bring top dollar.

Reticle came out great. Did not measure the strands, but suspect that they are smaller than the 0.0006 I have measured in the past. I say that because they look extra fine when peering thru the scope.


Frankenscope

Yes, this is the downside. I believe what we have here is a frankenscope, something that has been put together from parts. The first clue was already hinted at in my first report. The finish on the eyepiece was pristine, while the rest of the scope looked like an old sewer pipe. Then I found the buggered thread on the eyepiece end of the tube, which I spent 2 hours making better last night. Well, with the scope assembled, in order to get the reticle into focus, it was necessary to screw out the eyepiece so that only maybe ¼” of the1 inch of threads were engaged. This is why I never noticed those bad thread when I took it apart.

After the first assembly (yes, it has been together and apart at least 3 times this morning) the field of view was very small compared to the 2-inch objective. And the focus did not line up with the markings on the end bell by a long shot. I was using my neighbor’s garage as a target so I am not sure what it will look like when we try it at 50 thru 500 yards tomorrow at the club. I will reserve comment on this until tomorrow.

I mentioned taking it apart a few times. I was starting to question my memory on the center lens cell assembly when it did not seem to focus properly. The cell is threaded at both ends to accept the lens carrier and the mounting screws are offset quite a bit. The cell is about 2-1/2 inches long and the screw holes are about 5/8” from one end. So, I swapped the lens carrier to the other end of the cell, turned the cell around in the scope and reassembled. It did not help. Nothing but a big blurry mess when looking thru the scope. So, I took it apart again and reassembled the cell the way I had it originally. While I had it apart, I tried something else. I mentioned that there were two “baffles” in each end of the scope. They are a friction fit in main tube. You can slide them anywhere you want. The one that was just ahead of the reticle cell when I disassembled the scope has a 5/16” hole thru the center. The other is just behind the threaded section for the end bell. It’s opening is about 1/8” smaller than the tube ID. I have no idea what they do or it they were in the correct location when I took the scope apart. The fact that leaving them out made the field of view bigger/better is another clue to the frankenscope heritage of this scope.

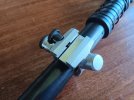
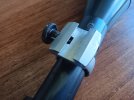
The last frankenscope feature is the rear mount. The front mount is the standard Unertl aluminum mount and intended to use standard Unertl mounting blocks with the crescent cut (aka “smile’) in the right side. The rear mount however is a Posa mount. The thumbscrew has a cylindrical end with a square face versus the convex end on a standard thumb screw. The base itself is split so that as the thumb screw engages a matching female cut in the mounting block it also squeezes the base closed to tightly clamp onto the mounting block. So, to mount this scope on a rifle you need a standard Unertl front block and a Posa rear. Another issue with the scope was the spring under the plunder for the rear mount was too long. The first 100 minutes of windage and elevation could not be used because the spring when to coil lock. I bought a shorter spring at my local hardware store and you can get all of the elevation adjustment and all but 50 or so minutes of windage now. I’m starting to think that this mount is intended for a scope with a smaller main tube. That longer spring would have worked with a ¾” main tube.

Not sure what my shooting partner paid for the scope. I have a feeling it was from one of his other shooting buddies and since it looked like was a relic from the Titanic, it was probably pretty cheap. If so, then might be worthwhile to send it to Iron Sight and have it properly sorted out. I guess tomorrow’s results at the range will dictate what the next steps will be if any.

Pictures

The finished scope, fully assembled

20240416_131250a.jpg

Here are the two hardware store 2-56 screws in place with their little beveled washers.

20240416_131341a.jpg20240416_131403a.jpg

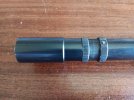
This is eyepiece showing how far out it is screwed to get the reticle in focus. This is not right.

20240416_131429a.jpg

Here are the mounts. Posa on the left and standard on the right.
20240416_131454a.jpg20240416_131501a.jpg

That’s it for now. I guess we’ll see what tomorrow brings when we take it to the range.
 

Snakeoil

Well-Known Member
As a follow-up, I called Iron Sight and talked to the owner. He was helpful, but did not give up any secrets. It might ho to them depending on what the owner wants to do.
 

Snakeoil

Well-Known Member
The visit to the range was a success. Although the paralax marking are so off that they cannot be seen, I was able to focus the scope clearly from 50 to 500 yds. And I suspect it will go down to 25 yds, but did not try. Called Iron Sight back and spoke with Mike again. He has a set of brand new Unertl mounts for a 1 inch tube. I asked if he would do any horse trading for the mounts on the scope and he said no without hesitation. Then I asked if he sold scopes and he said yes and he would consider this scope as a trade in towards one of his scopes after he saw it. So the ball is in the owner's court.