Learning to paint OCP

Ian

Notorious member
I have a "thing" for the Crye MultiCam(tm) camouflage pattern. Problem is getting the stuff, as they're more protective of their copyrights than Alexander Arms, and trying to purchase small amounts of stuff like fabric or hydrographic film from the very few authorized distributors is difficult or impossible. If one wants to paint it, one must learn how it's done, which I'm here to say ain't easy to get right. I also have a "not thing" for the color black, the color of most AR-15 stuff, or anything "tactical", so I got to learn how to spray paint an AR-15 in what I'm going to call Operational Camouflage Pattern, or loosely, Scorpion W2.

Challenge #1 was discovering just exactly what is "Multicam". Just about every image I found on the internet is different from the next in color scheme, tint, or in some instances the pattern itself. There is the original, much copied Crye pattern, then OCP, and Scorpion W2. The latter two have no "stick" shapes to their pattern, and being less directional, are the ones I chose to emulate for a rifle that might be seen either in a vertical or horizontal position at any given time in the field.

Challenge #2 was finding paint. For one thing, no one can seem to agree on how many or just what the colors for any of these patterns actually are. Some have bright yellow blended with blue-green, some have pink, some grey, some light sage, some actually use a solid OD yellow-green and blend with darker OD. So I just picked one image that matched my existing knock-off brand gear and went searching for paint. I bought 12 cans of spray paint from three different stores and still didn't find quite the shades of green I wanted, so I used four colors dusted over each other to get the two distinct, blended greens needed. What a pain. Next time I do this I will be purchasing Lauer DuraCoat in the correct colors and be done with it.

Challenge #3 was figuring out the pattern. Utoob has a few videos that I watched and tried the methods, but ultimately I found all that pretty much a "fudge" for the real patterns. After experimenting on several objects and two other take-off rifle stocks, I pretty much got it.

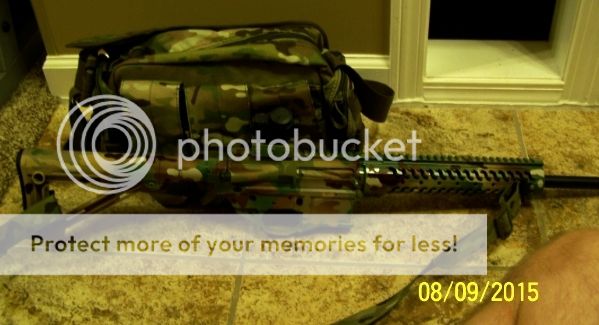
So I stripped my Macon Armory DI-45 down to parade rest, degreased it, got all the silicone gun lube out of the pores, prepped the plastic parts (receiver is plastic too), and got busy. I put the base color on last night and started cutting patterns and blending colors on it this morning. Overall I have about 6 hours in painting and about twice that in teardown/prep. I have no idea how much research/testing time I have in it, but it's been my obsession for basically two weeks. Here are some pictures, keep in mind that some of the colors are flat and some satin and that I haven't put the matte clear coat on it yet as the paint will probably need to finish curing for at least a week:


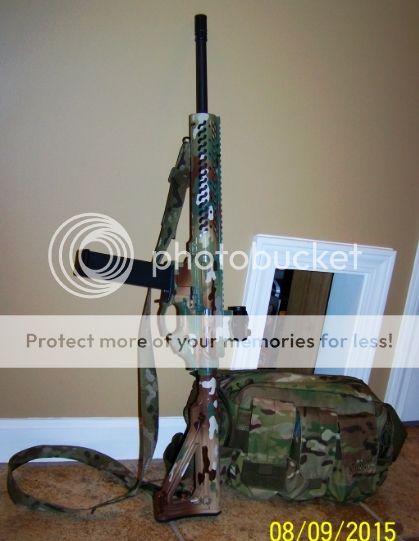
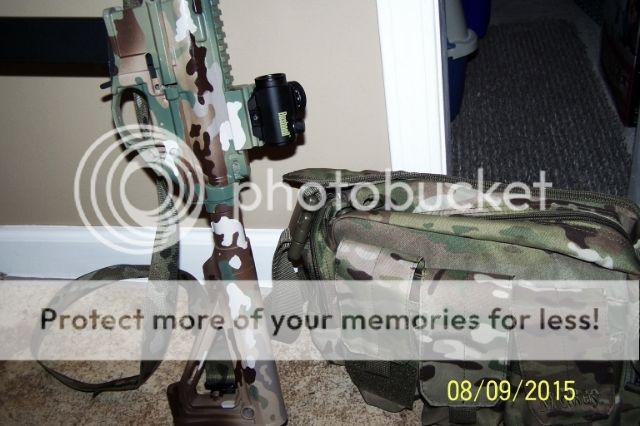
I'll probably put a greenish Magpul MOE hand grip on it to replace the black one I have now. The rubbery stuff doesn't take kindly to paint and I prefer that style grip. The magazines and exposed part of the magwell adapter will get painted too, but I'm leaving the red dot sight, small parts, and barrel alone for now. I tried to work the pattern such that the small parts make up some of the small dark "dots" rather than paint the parts. The dust cover needs painting, but that will have to wait until I catch another wave of enthusiasm, maybe when the magazines get sprayed. I'll try to match the pattern on both sides of the dust cover so it looks right whether open or closed. (Yes, OCD much).

WHEW! I'm tired.
 

Ian

Notorious member
Here's how I did it if anyone is interested. I think it's pretty accurate and true to all three basic patterns of multi-flauge.

1). Base coat is Krylon Fusion Satin Khaki. This has the correct amount of pink hue and blends correctly with the brown to yield the other shades between pink and brown. The Fusion has the added benefit of adhering to most plastics, which is handy for AR-variant components and accessories. The Fusion works, I tested it, but it has drawbacks in other colors used for topcoating because it contains some sort of extra solvent that really eats up plastic and layers of paint underneath.

2). Lay down just a few medium-sized FEMALE stencils and paint in some splotches of Valspar Satin Seine (from Lowes). This is a tricky color and the only brand I found that has it just right. This grey/beige color is not blended in the pattern, in other words has all "hard" edges. In a place or two put small, MALE stencils to preserve a few streaks and dots of the pinkish Khaki beneath, it is part of the pattern.

3). Remove the previous stencils and dust a few large areas with Ace Leather Brown Satin, fading to full brown in the center of the fades. The Khaki/Brown fades make up about a third of these colors on the layout, with straight Khaki and straight brown being about a third or so. Maybe less solid brown, but it will all be overlaid with the greens so it isn't critical. The Ace paint is one of four brands of basically the same shade of brown that I bought, I settled on the ACE brand simply because it sprays as a very fine mist and by far makes the best blends with the Khaki. The others, particularly Rustoleum, tend to splatter and speckle in the middle of the fades. Don't get any brown on the Seine patches, if necessary tape them off or shield them. Seine and straight Khaki go together on most of the pattern so don't paint brown near the Seine.

4). Now for the difficult part. In the dominantly pink/Khaki/faded brown areas, use a few small FEMALE stencils. In the predominantly dark brown areas to be contrasted with the greens, use medium and large MALE stencils to cover areas of brown and blended brown/Khaki. Try to arrange the male stencils so the green patterns to be sprayed next make sense, ultimately in the darker brown areas the greens will cover about 50% while in the lighter areas the greens will be 10% or less. The large male stencils preserve the fades and brown while the female stencils allow some green accents in the dominantly pink/Khaki zones.

5). A small but important and difficult detail to laying the patterns above is to again cover the Seine blotches so they don't get sprayed over or blended. I spent more time figuring out how to do that than just about any of the other stencils. It might be easier, in restrospect, to just paint the Seine parts in next-to-last, but I'll leave that up to you.

6). Dust in some warm yellow-green (almost avocado) paint. I used a sage color dusted over with Eden yellow and Rustoleum Oregano to achieve this. Cover about 2/3 of both the male and female stencils with this shade, streaking diagonally or at least the opposite angle as the brown was previously applied over the Khaki. Next, fade in some darker green in the same direction, trying to make a fade of dark/light green in every stencil yet leave plenty of "hard" light and dark greens on various edges of the stencils. I try to end up with the same dark/light distribution of the greens as I do with the brown/Khaki.

7). Remove all the stencils again and study the pattern. Now is the time to make corrections if necessary.

8). Finish off with the two accent colors, I used Krylon Fusion River Rock for the "white" and Rustoleum Satin Espresso for the darkest brown. Most all the various multi-flauge patterns use these the same way, laying down horizontal patterns of streaks, tiny dots, and small blotches in rows while clustering both colors more or less together. You can use female stencils and a lot of masking, or you can just spray some paint into a jar and paint them with a brush. I've done it both ways and get better results much more quickly and no edge bleeding under the stencils using a small artist's paint brush. The white often overlaps the brown to give a sense of depth. If I were an "exuberant" interior decorator I would say these accent colors make the pattern "pop", but I'm just a grease monkey so I won't. Some methods I tried involved putting down a white accent color as a base and taping off the accents for the duration of the painting, then spraying the whole thing again with the espresso and again taping off the accents (overlapping some stencils so the white appears "on top of" the dark brown) and then building the rest of the colors up, but I don't like the idea of using the lightest overlayed with the darkest color for a base, doesn't seem like it would look very good when worn. One nice thing about the way I do it is if you have any "faux pas" with your stencils, as in dirty edges where the edges lifted up, or any other dings or small mistakes, just cover them with the light and dark accents!

9). Really, that's it, just topcoat with matte or flat clear, on a DRY day or it will frost on you. Flat is worse than matte for hazing in my experience.

I hope this may help someone out, maybe someone doing an internet search for methods to do what I was trying to accomplish. It ought to get some Google hits once the 'bots chew on it for little while. Remember, this is "hobby only" information and don't copy the patterns verbatim because Crye Industries holds a copyright on their design, and I think the US military has patents and/or copyrights on the Scorpion W2 and probably the OCP pattern as well. This is just a guide for dinking around with paint to get close 'nuff to match some commercial gear. I wouldn't mind paying for water transfer film in the correct pattern IF I could get anyone to sell the film to me in small quantities. Hydro dipping would be a dang sight easier to accomplish, too.
 

Ian

Notorious member
Here are a couple pics of some of my experiments, not including some of the simpler but less accurate methods I tried. The 10-22 stock is finished in Krylon Matte acrylic spray, and my wife has claimed it. In fact, she made me finish the details on the other side and I guess I'll have to build her her own "ranch rifle" now. :rolleyes:


Some of the stencils I used on the 10/22. I took pictures so I wouldn't get confused as to what color was what underneath as I built layers up. On this one, I left the stencils on until the end and just kept layering them on top of each other, then went back after all the Seine/Khaki/Brown and greens were painted, removed the stencils, and used female stencils for the light and dark accents. For some reason I intentionally faded Khaki and Seine, must have been that way in the pattern I was using as a guide at the time. The method I used on my AR is much easier and you can see what you're doing as you go.


The other side.....


Ian

Notorious member
Grrrr. Sitting here looking at the pictures again I just realized that on the AR I completely forgot to stencil in some hard edges between the shades of green. That's an important thing in some of the patterns, lots of blends and hard edges with the greens but only soft blends with the Khaki/brown. Some light/dark green hard edges are darker on the convex side, some lighter, I got it right on the left side of the 10/22 stock but not on the right side, will have to post a picture of the finished left side to show what I mean about the light/dark green hard and soft blends.

The thing about an AR is there is really very little to paint, and it's easy to scale too small or pack too much detail on there trying to get in every part of the pattern.
 

Brad

Benevolent Overlord and site owner
Staff member
Nice paint job. Just don't lean it against a tree or you won't find it again. That is waaaaaayyyyyy too much work for me. Me? Not so much OCD, more just lazy.

I'm a black rifle in black kind of guy myself. My competition AR only had a Grumpy sticker on the stock to distinguish it from all the others.

How is that 45 shooting for you?
 

L1A1Rocker

Active Member
Looks good. That is something that I have absolutely zero aptitude for doing. My brain just doesn't work that way. I just have to be envious of those that do.
 

Ian

Notorious member
Thanks, guys. It's a pain in the butt for sure, but at least if I do it again (might do the M1A stock and scope some day) the head scratching part is pretty much done.

It actually shoots pretty well, I'm able to put a magazine full 14 rounds, essentially) into 2.5" or less at 50 yards consistently using the red dot (either four or five MOA), I'm sure it would do better with jacketed but that stuff is way too expensive. One thing that I think is an issue using cast bullets is the enormous gas port that is basically right in the throat...can't be good for the clean edge of the bullet base as it passes across the port at near peak chamber pressure.
 

carpetman

Active Member
Here is a picture of a couple of rifles and a handgun I painted with my secret camo paint.


If you would like more info on how I do it, go back and reread the first sentence, operative word being secret.
 

Brad

Benevolent Overlord and site owner
Staff member
Damn, that is a great paint job. I can't even see the rifle, I think it's a rifle, against the background!
 

Brad

Benevolent Overlord and site owner
Staff member
Is that a revolver sticking out behind the rifle stock? Hard to tell with the camo paint and all.
 

carpetman

Active Member
I'd like to give you more details, but I'd lose my element of surprise. As stated it is a secret. I will give you one detail about one of the guns. It is unique in that it will shoot BS without splattering.
 

Brad

Benevolent Overlord and site owner
Staff member
Whoa, a politician gun? I have heard of them but never saw one before. I never thought it was possible to shoot BS without splattering but now I am a believer.
 

Ian

Notorious member
Ha! That's not hijacked, hijacked doesn't happen until Lamar gets here and we manage to drift off to discussion of camshaft phasers, flaming polyglycol in the wee hours of the morning, and the Three Jessicas all in a span of about ten posts.

I'm impressed with that BS Camo pattern, it's tough to get right. Brad and Rick, if you look closely, you can actually make out that the rifle is a non-recoiling .30-'06. Ray happens to own the only example in existence. Don't ask him where he got it, that part is top-secret.
 

carpetman

Active Member
Ian, actually I don't own the only non recoiling 30-06. True story. I was at a 21 table in Wendover Nevada one time and a guy told me about his non recoiling 30-06. I said you must be shooting cast bullets and he told me they were 500 grain bullets. I don't think you could close the bolt so I guess it didn't recoil. I didn't bother asking him where he got the 500 grain bullets, because I doubted I'd believe that part either. I think his BS splattered a little.
 

fiver

Well-Known Member
here I am...

when I looked at camouflage painting and at real world spots where I hunt and sit while hunting, I come to a small realization.
camouflage is really the play of light and dark against each other.
it's like looking at sunlight dappling down through the trees, even from the front looking in.

it really hit home a couple of years back when I was standing stock still pointing my rifle at a nice 4x4 buck and peering through my scope at him.
I couldn't see his antlers [or a firm body outline] he couldn't see me or littlegirl who was partially behind me in a similar camouflage set-up.
we were 40 yds apart and both out in the open, but under speckled pine tree sunlight.
 

Ian

Notorious member
I've hunted white-tailed deer for years with blued steel/walnut rifles while wearing jeans and whatever jacket/heavy shirt I needed for the weather. The things I've found about going un-noticed involve movement, sound, and smell a lot more than a perfect color and pattern blend. Military camo is of course designed to conceal things from other humans, including those using IR night vision, a totally different concept than hunting. I just dig the way the multi-camo patterns look, and how much easier the pattern makes the AR platform appear to MY eyes. Don't worry, the 300 Blackout and all its support gear is staying 100% "blacked out". ;)
 

fiver

Well-Known Member
I don't own an all black AR rifle, they all wear flat green full length stocks for some reason.
I do have a couple of all black manual type bolt rifles that would appear to be EBR types.

the play of light and shadows has been pretty useful in many types of 'hunting' I have done over the years.
I recall a talk I had with a buddy of mine that was just back from Africa and had met a professional hunter while he was there.
the guy always wore Hawaiian shirts.
my friend made the observation that the shirts seemed out of place in his line of work, and the P/H. chuckled and said they were only out of place in town.

I don't get all worked up about going full commando while hunting either, but do understand why the old timers wore checkered contrasting flat colors while hunting.