
You are using an out of date browser. It may not display this or other websites correctly.
You should upgrade or use an alternative browser.
You should upgrade or use an alternative browser.
Shot making
- Thread starter rodmkr
- Start date
Missionary
Well-Known Member
Good morning
You can pretty much make all the parts you need if you are willing to do the work and put in the time experimenting.
Small shot is the easiest. Once you get to #6 and larger it becomes more getting every aspect perfect.
Go to any web sight that has forums on shot making and read alot. The other cast place has alot of info.
fiver
Well-Known Member
cheap enough for sure, but one of those single dripper jobs will take all day to make a bag of shot.
I have made over 300 lbs. of shot in a single day with a Littleton shot maker.
they will tell you more of course but the reality is it takes a while to get the machine up and running properly, and the catch fluid up to the proper temp.
then comes the washing, sorting, rolling, etc to make the shot real nice.
 these are pretty much the same machine as the Littleton only around 100 bucks cheaper.
I have made over 300 lbs. of shot in a single day with a Littleton shot maker.
they will tell you more of course but the reality is it takes a while to get the machine up and running properly, and the catch fluid up to the proper temp.
then comes the washing, sorting, rolling, etc to make the shot real nice.
Shop
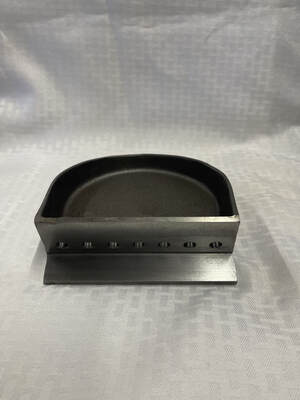
NEW PRODUCT! Cast Gray Iron Lead Shot Pan With One Set of #7.5 Drippers. $250.00 With FREE Shipping!
www.oasisleadshotmaker.com
Dusty Bannister
Well-Known Member
I have a friend that is also a shotgun enthusiast and he really is dedicated to the craft of making perfect shot. I think his ladle only has 8 drippers, but that is a full time project just keeping things running right. In addition to the equipment, he needs to have clean ingots of sufficient alloy. The correct melt temp and melt level, coolant temp and level (keep in mind you are constantly adding shot and temperature to the coolant container and it will fill with shot). Then there is the draining of the coolant from the shot, washing the coolant residue, drying the shot, screening to sort by size and remove goobers or poorly formed shot. Then you can apply the graphite and store for future use. This gets to be too much like work for someone like me. Unless you just want stuff to shoot for close in pests and such. I admire people that are dedicated to the craft, and knowing how much work goes into it, find it is just not something I have the desire to do. I will never be good enough with a shot gun to tell the difference between promo and prime shot shells.
I have a sort of home made one, had my buddy weld up the frame and use the Littleton nozzles, I got one of the high temp furnace coils, poured a base out of high temp casting compound, laid the coil in place covered with a light layer of casting. set the shot maker on top and light it up., Fiver and Dusty are right, it does take a while to get it up and running right. I use pid to control temp and I do have to use a torch on the nozzles and drop plate from time to time but it makes pretty good shot, I only run it 1-2x a year, I can make enough shot for any skeet shooting I do in a year in 2 days

The container on the right is Eagle #8, The container on the left is Hrpenley #8 (it kind of looks smaller in this pic but its lower in the container, the eagle is full to the top, they are actually the same size)

If you look they are not perfect spheres and the occasional swan or oddball I missed in the screen but I'm not that picky its skeet with friends, I blended pure lead and superhard for 5% Sb content. My next run I will be using a new alloy that has same PbSb content but will add an additional 0.15-0.20 % Arsenic content to see if I can improve it a bit.

This is my home made rig, I had my buddy weld up a box that matched the dimensions I found online, drilled it out and got me a couple sets of Littleton nozzles thing I got 6, 7.5, 8, 9 . installed a temp probe and PID. first I tried the electric plate to heat it, (2nd or 3rd now serves as a great base for wiring) that wasen't cutting it, I think it was a little larger than the standard plate will take, I kept kicking them out, so of course I bypassed the thermal protection and fusing. they worked for a while..... Then great Idea!!!!!

I got a 5gal bucket of 3000deg kiln base plaster. Above is my first attempt, I kept it don't know why but it works good to cool lead ingots on now., Once I learned how to work with it correctly, I took an electric oven coil, did the calculations and stretched it to the right size (lines show the loop path) I poured my mold in 3 parts 1;Base) I selected a plastic Tupperware container just a little larger than my shot maker shell and about 4" deep, (dimensions will vary to whatever your shot maker happens to be) I cut some high temp kiln insulation as you can see in the above picture just under the shot-maker shell. (there is also a sheet of it attached to the front to protect plastic wires and hose lines from any lead splash) I used it to line all 4 sides of the Tupperware container (Now to be referred to as mold). I filled the mold with about 1" of plaster then placed another sheet 1"-1.5" smaller (if you have an 8" sq. mold then cut the insulation to 6.5"-7") of the insulation on top center of the fresh plaster. 2 body) I then poured an additional 1.5" of plaster on top of that (still wet) I then lined it with saran wrap, seated the shot maker down in the mold and pushed it down and tilted it to a forward angle I added enough extra plaster to fill the walls up around the shot-maker shell and let it start to set up. Once it was firm I removed the shot maker and plastic, I then carved out the path for my electric coil. I used some stainless steel U type pins to hold the coil in place, I also made a few extra holes for the next part. 3 finish) as soon as I had the coil and ceramic connector in place I poured an additional 1/2" or so of plaster over the top of the coil. I put more plastic wrap on it - re-seated the shotmaker shell, got my incline back where it needed to be after a little fight with now stiffer plaster and let it get firmed up. Pulled the plastic off and let it dry. After the learning curve, some "tuning" and a lot of lip polishing it actually worked out pretty well as you can see by the results, It does however have a few drawbacks, it dosent get hot as fast as I would like, the coil was rated 3000w/220, 1500w/120 It would probably run better on 220 but I don't have it available without running new lines across the house and I find I have to use a torch on the drip lip a number of times to keep it from sticking and really only on the outer nozzles Other than that it holds temp good and makes pretty good shot. My winter project is to redesign the heating base instead of just 1 coil I will use 1 on the base like before but I will be adding an aditional coil to the sides and under the lip along with a higher wall for insulation. I think that will get rid of most of the remaining issues, below is a pic of the coils I used and will be using in the new version.

Last edited:
fiver
Well-Known Member
I can see the little dimples indicating your catch fluid temp is a little off.
another small suggestion.
I'd try some tin not more other stuff.
3% antimony is kind of the second tier standard now days, federal, Rio, estate and several others use right around that amount, [in their standard factory loads] and anything under that really isn't worth buying [even though many do]
for skeet what you have will work just as good as anything you can buy.
[and as an FYI for everyone. eagle shot runs small, 8 is more like 8 1/2's]
Tin you think?I figured tin would flatten it out, I had read a few places the arsenic would help sphere it up better, I also read it could be temp of coolant or viscosity of coolant. I didn't use a thermometer on the coolant I use downy cut with some water, (I know there is better but downy easy to clean up and remove from shot) as far as temp if it starts getting pretty warm I add a little ice to the overflow tank. any temp range suggestions too hot/too cool? Also any suggestions for viscosity from anyone welcomed. (need thicker or thinner) I haven't used it a bunch of times, just 2 maybe 3x a year, once I get it running pretty good I burn out 50-60lb, Since we only skeet shoot a few times a year I don't get to experiment a lot, and its messy. I blind tested the shot on 4-5 guys, (made 2 loads - 1 with eagle and 1 with mine - same powder/shell/primer etc and no one was able to tell them apart.
fiver
Well-Known Member
I run fabric softener about 50-50 45-55 with tap water.
I don't remember what the catch temp I run last time was but it was just hot enough to see a wisp of steam coming off the top right as I started.
it has a little different sound to it when it's up that hot [shorter psshew sound] I'd guess maybe 160??
yeah tin helped me get a bit better shot.
I kinda just run onto it when I was getting low on my scrap stuff and threw a few dozen ingots of my 1.5% tin alloy in the mix.
then I got to reading about a couple of other guys using it, in even higher amounts, and was like well okay maybe that's why my last batch was as nice as it was.
IMO it isn't in the alloy hitting the fluid, it helps the alloy flow through the drippers better so it rolls down the ramp better.
fiver
Well-Known Member
well,, keeping the pot at a constant temp is important.
as is keeping the alloy level, the alloy level pushes the drips out faster or slower making bigger or smaller shot.
I keep my shot maker about the same temp as I cast bullets at.
it's kind of an eyeball judgment where your keeping the pot temp more steady than the alloy temp so the ramp and spouts don't change temp [or freeze] more than a constant worry on alloy temp.
it would be a neat addition to hang a pot over the edge to feed alloy and to just feed the pot cold lead letting it run into the shot makers bowl.
but I just make small thin ingots and lay them in the back of the bowl.
as everything gets up and going smoothly a full size ingot will melt down easily and I will have 2-3 of them sitting up on the edge of the bowl waiting to go in.
the whole process really is like bullet casting, but your on the move checking and shifting everything constantly.
Same here, 660-680 is what I set pid at (varies a little), I have a leaver in the back of mine kind of a melt/run thing, I shift to the incline position once I have a good pool and set my bricks at the back end, its electric so I have even temp across the bottom and the temp probe is inserted in place of 1 of the nozzles for good temp feedback. I have though about the 2nd pot but I want to try a new heating base first.
JWFilips
Well-Known Member
Not what one would thing about shot making but I did take a neat class in 17th century "Rupert" shot making...Most likely forgot more then I learned but the stuff looked like "Tear drops" Fired a bunch in my flintlock smoothbores enough to collect some upland birds!
Seemed to work fine for unconventional shot
Seemed to work fine for unconventional shot
fiver
Well-Known Member
yeah, you can make shot with a colander and a ladle.
kind of no guarantee on size [other than what the holes in the colander let out] or shape since they will drip and don't have the time to round out.
even the pro's really don't get exactly one size of shot when they drop it.
[most of them don't even drop it any more, they blow it up after it falls about 10-12 feet to simulate falling off a tower]
so what they do is have a roller board they roll the shot down.
the board has slots in it, the smaller sizes fall through the thinner slots closest to the top, the bigger stuff rolls over it and keeps going, and the not round stuff rolls to the edges and over the sides.
that does a good job.
but it isn't perfect, so you end up with some 8-1/2's and some 7-1/2's in a bag of number-8's.
Rally
NC Minnesota
How many nozzles and how much shot can you make, in say a day at the helm? I'm seriously considering getting in to shot making. My biggest concern is making the larger sizes, because I don't use much under a size 6. I've surfed around the net and opinions vary a bunch. I'd be real happy with one that made a pretty consistent #5.
I run 4, have 5 but temp probe takes up 1 space, I also pre-cast my alloy so I can easily run off 50-60 lbs from start to finish, (dried & tumbled) in an afternoon. Haven't tried anything larger than 6 but I'm sure you would run a lot more weight in the same amount of time with the larger shot sizes. I like to stretch it out over the weekend, That way I can spend less time with my other half..
Last edited:
fiver
Well-Known Member
I'd have to go count but airc mine is 8 single drippers.
I have banged out 300 lbs of shot in a day, the first 20 or so went back until I got everything settled in then I went to town letting everything roll and keeping it all moving.
there is a frustrating learning curve where you mess up most of what you make and once you get it going you really don't want to stop.
but once you have a handle on things it's pretty easy to get back up and going again.
if I was really going to run mine all the time I'd build a sorting board and a roller to help the shot out, and make adding graphite easier.
Rally
NC Minnesota
That would be worthwhile if I could make 100-150 lbs of #5 or #6 in a day. I'm picturing a set-up that has a way to run at least two of my 20# pots into the maker once it got rolling. I'm thinking filling with one and refilling the other as needed. The insulation on the bottom of hrpenley's makes sense to me, because reading about it seems most are having trouble retaining heat. Maybe a lid on half the maker pan would help?
Can't be any more frustrating than learning to cast with an RG4 brass HP mould, but once you get them rolling it's hard to stop.
Can't be any more frustrating than learning to cast with an RG4 brass HP mould, but once you get them rolling it's hard to stop.