Snakeoil
Well-Known Member
I may have mentioned this topic before, but never provided any details. During the winter at Wilton, to avoid the cold and keep shooting, we used to hold what is affectionately called a "Chicken Shoot" for reasons of which I'm not aware. Bascially, it is a 50 foot pistol target placed at 25 yds and everyone gets 1 shot at the target. Best shot wins that round. We normally shoot 10 targets. At first, while waiting to shoot, guys shot the breeze, drank coffee or other stuff. Spotting and scoring was shared by two guys and in order to know how you did, you'd have to wait for them to stick a pin in the scoring target on the firing line.
Well, an enterprising gent at the club who used to make his own cartoon videos, thought his cell phone mounted to a spotting scope would make life much easier for the spotter and put a small screen on the firing line so you could see your shot. The only problem with that, was you'd have 10 guys breathing down the spotter's neck and the screen was tiny. So, I had a webcam stuffed in the back of a drawer in my office and dug it out. Then I made a mount that would hold it on my spotting scope. Made it from a piece of PVC pipe. Had an old computer I brought to the club and that was much better. But we still had the mob hovering over the spotter. So next shoot, I started bringing a flat screen TV to the club that we use at our camp in the summer. We bought a wall mount from Horror Fright that we mounted on a post up by the ceiling and could be viewed easily by anyone sitting in the peanut gallery. This turned the match into the shooting equivalent of watching bowling on TV. The target would be huge on the flat screen and we all could see the hits as they were fired. Made for some great comments, ball-busting and similar, not to mention the Ooohs and ahhhs, similar to the audience on the Price is Right. It was such a hit that another member donated a huge flatscreen TV. Now even the blind guys could see the hits.
So, I thought I'd share the mount that I made since it is simple and effective.
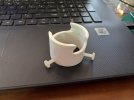
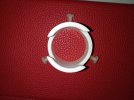
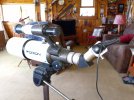
Start by finding a piece of PVC pipe or a PVD pipe coupling that with fit over the eyepiece on your scope or can be machined on a lathe to fit. If you don't have a lathe, you can drill it in 3 places for set screws that will hold it in place. In that case, pick a piece of pipe or coupling that is as close to a perfect fit as you can achieve.
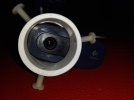
The hard part is cutting the channels that hold the webcam. For me, it was a matter of a coping saw and files. I've made 4 or 5 of these so I have a good feel for it now which makes it go faster. You do need to check how far the camera needs to be from your eyepiece. If you have an extended relief eyepiece, you'll need a longer piece of pipe. Then it's just a matter of whitting away at the pipe until the camera slides in with a little effort and the lens is centered. Friction will hold the camera in place.
This set-up works nicely at the range. First, you can have your laptop on the bench and more easily view your shot placement. You can also snap a photo of the target after every shot to get a sequence of shots and never have to do downrange or make a note on paper. It also makes it nice if you are testing loads and others have interest in what you are up to and can see the results on the screen.
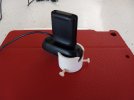
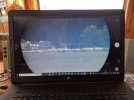
Here are some pics of the one I made today for the big spotting scope we have at the lake. This is the scope that I used to shoot the pic of that bald eagle the other day. Now I won't have to try and hold the camera steady while taking the pic. This one has set screws because the scope has 3 different lenses and they are all sightly different OD. Set screws make it nice and solid. Used 8-32 nylon screws to avoid marring the lenses.
Note that picture on the computer screen is a little fuzzy because the mirage over the water is brutal today. The mirage waves in the air are as bad as the waves on the lake.


Last edited:
