You are using an out of date browser. It may not display this or other websites correctly.
You should upgrade or use an alternative browser.
You should upgrade or use an alternative browser.
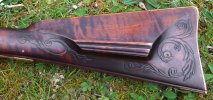
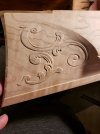
Isaac Haines kit build log
- Thread starter Ian
- Start date
Ian
Notorious member
Wow, Ian......I'm impressed! You are doing an excellent job! I see nothing that would cause "a ruler slap on the knuckles" by the
"PA School" mob!
Thanks! High praise coming from you. I can't say I'm getting the hang of it after three panels but it's getting done.
JWFilips
Well-Known Member
On my first scratch gun in the 1984 I knew I could not "incise carve" but I decided to do "raise relief " carving!
Reason was; I was not experienced with a vee chisel but I could draw and I was good cutting radiuses with an #11 Exacto blade. I figured If I could outline the drawing on the stock with a vertical blade cut, then go in with a 60 degree relief cut, I would have a good starting point! Then I removed the background starting at that relief cut and blended it into the stock with a flat chisel. Since I felt pretty confident with that concept, I went right into the real wood from the start & it worked for me.! Did it without any practice. So that has been my method. Many years later I met the excellent builder, Pete Alexander ("Gunsmith of Grenville County") and that was exactly the way he worked! We talked about this a bunch!
Didn't learn to incise carve until 2000 when a good friend thought me to use a vee tool by chasing it with a mallet like I did metal engraving! Learned that carving method finally after 16 years of building.
Ian
Notorious member
This is my first go at carving maple and first foray into any kind of rococo scrolls. If you know how to sharpen and use a chisel, you can carve decorative designs wood, no big mystery to it. The only thing that is particularly new to me is the long skew chisel, which really is a knife in use. Took about three shavings to get the hang of relieving up to a line and gauging where the point is under the chip, great tool. Push it with your thumb and when it starts resisting because it's about to dig into a dip in the grain, draw and slice out of it.
My first incised wood engraving took a minute on a test piece. I kept slipping just enough to spoil the curves and get little overruns. "Hmm, this is like engraving metal, which I do asian style. Need a mallet. A very light mallet." My wooden file card was handy so I grabbed that and started tapping away, problem solved!
My first incised wood engraving took a minute on a test piece. I kept slipping just enough to spoil the curves and get little overruns. "Hmm, this is like engraving metal, which I do asian style. Need a mallet. A very light mallet." My wooden file card was handy so I grabbed that and started tapping away, problem solved!
JWFilips
Well-Known Member
I seldom use a "skew chisel" because I do not understand it! If you have any tips as to how and why to use it I would love to hear!
I relize I never knew how to really sharpen a vee tool properly: So my buddy & builder in NY asked me to send him my tools . He sharpened them and made me up a set of "honing woods" for me to keep them in razor shape. I keep each of them with each vee tool so I do not mix them up.
I relize I never knew how to really sharpen a vee tool properly: So my buddy & builder in NY asked me to send him my tools . He sharpened them and made me up a set of "honing woods" for me to keep them in razor shape. I keep each of them with each vee tool so I do not mix them up.
Ian
Notorious member
I don't know how to sharpen a vee chisel either. I stroke it on a wet India oilstone to get the edge, wipe the inside with a few swipes of backed 600-grit paper, then on a hard strop loaded with rouge, wipe it off and put it to work.
Here's a trick for your incised carving: grind and polish two back relief angles on it within a hair of the cutting edge. This relieves the metal that always gets in the way and tears out wood when making tight curves. Steve Lindsay patented this technique for his graver points and sells a set of grinding jigs to put this relief on gravers for the same reason.
If I can rig a phone holder I'll video how I use a skew chisel to relieve background up to cut lines.
Ian
Notorious member
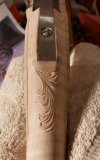
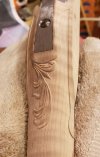
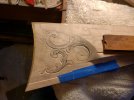
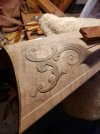
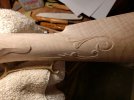
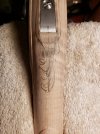
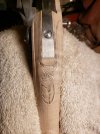
Did some tidying and detail work on the left wrist panel while mulling over the tang panel. I saw this photo of a freshly carved, matched pair of maple pistol tang areas on Pintrest and looked it up again. Yep, perfect for this big, flared tang. I mostly copied it, freehand sketching to fit the area and proportions of my rifle tang. Was going to go to bed but I was feeling good so I picked up the vee chisel and made it permanent right then.


Last edited:
JWFilips
Well-Known Member
Ian that first photo above of the "cleaned up" relief, is close to excellent....not sure if mine has ever been that smooth!
What my friend sent me with my sharped Vee tools was Polishing sticks for inside the vee! I believe the are poplar wood tht was cut with the inside of each tool. He has them coated with green polishing compound. Each on is kept with it's respective chisel in plastic bags. They are use to strop the inside of the vee as the last polishing step. He told me All the need is stropping as long as I don't drop them or hit something that is not wood! So far so good.... but I really haven't done much carving since I got them.
What my friend sent me with my sharped Vee tools was Polishing sticks for inside the vee! I believe the are poplar wood tht was cut with the inside of each tool. He has them coated with green polishing compound. Each on is kept with it's respective chisel in plastic bags. They are use to strop the inside of the vee as the last polishing step. He told me All the need is stropping as long as I don't drop them or hit something that is not wood! So far so good.... but I really haven't done much carving since I got them.
RicinYakima
High Steppes of Eastern Washington
Missionary
Well-Known Member
That is looking like a rifle to be placed up in the "Big House".
Ian
Notorious member
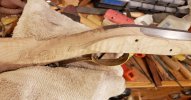
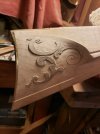
I made a few corrections as best I could, put in the last details, and decided this panel was as good as I could get it.
Then I did a little finish experiment. There are all kinds of ways to prepare carving for finish, most are cheats that seem aimed at avoiding raising the grain in the carved areas. I made up a batch of ferric nitrate in a water solution, brushed it on, blushed it, and detail sanded it followed by a light burnish with a very fine Scotch Brite pad. Here it is with some 91% alcohol sprayed on to test color:
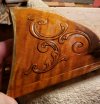
I want it a bit darker (raising the grain with rhe stain and whiskering it lightens it some) so on with a second treatment of ferric nitrate. I won't put any oil on it until the entire stock is ready to do. I can still make modifications now and re-stain it, but once the oil goes on it's forever so I want to make certain all the bad spots are found and fixed and the stain is even all over before fixing it in place.
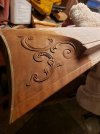
Then I did a little finish experiment. There are all kinds of ways to prepare carving for finish, most are cheats that seem aimed at avoiding raising the grain in the carved areas. I made up a batch of ferric nitrate in a water solution, brushed it on, blushed it, and detail sanded it followed by a light burnish with a very fine Scotch Brite pad. Here it is with some 91% alcohol sprayed on to test color:

I want it a bit darker (raising the grain with rhe stain and whiskering it lightens it some) so on with a second treatment of ferric nitrate. I won't put any oil on it until the entire stock is ready to do. I can still make modifications now and re-stain it, but once the oil goes on it's forever so I want to make certain all the bad spots are found and fixed and the stain is even all over before fixing it in place.

Missionary
Well-Known Member
Some fellers will walk the woods all their life and never have as fine a looking stock as I am seeing here.
Last edited:
Ian
Notorious member
I think there are other metallic solutions that might also require heat to develop but I'm not sure. The ferric nitrate is the only part of the process I'm using on this gun that needs heat.Is it just the iron nitrate that gets the heat gun treatment ?
I Iike whiskering with iron nitrate because it really crisps up the fuzz and makes it easy to knock off.

